WordPress blocks have revolutionized the way we build and manage content in WordPress. With the introduction of the Gutenberg editor, developers can create custom blocks to enhance the editing experience and provide users with unique functionalities. In this article, we will explore creating a custom WordPress block called the Author Comment Block. This block will allow users to display an author’s name and comment on their content.
Prerequisites
Before we dive into creating the Author Comment Block, there are a few prerequisites you should be familiar with:
- Basic knowledge of WordPress and how to create plugins.
- Understanding of JavaScript and PHP.
- A local WordPress development environment is set up on your machine using tools like WAMP, XAMPP, or Local by Flywheel.
Setting Up the Development Environment
The first step in creating our custom block is setting up a development environment where we can build and test our block. To do this, we need to:
Set up a local WordPress installation using WAMP, XAMPP, or Local by Flywheel.
Setting up the local development environment is very easy just download the software and install it. Choose the local development software which one you are most comfortable with. Here you can find how to install WordPress locally using Local by Flywheel.
Create a new plugin folder for our custom block.
After all is set and done let’s create a plugin for our custom block. In the WordPress directory navigate to the folder called wp-content and then go to the folder called plugins and create a folder here. We are calling it angelblock. Now the fun part creating the actual plugin. Let’s create a PHP file called angel-block.php. Also, let’s create a couple of folders called css and dist for putting css and javascript. In css folder create a file called block-styles.css and in dist folder create a file called block.js. Follow the folder structure below.
Folder Structure
- angelblock/
    - angel-block.php
    - css/
        - block-styles.css
    - dist/
        - block.js
Creating the Block Plugin
Open the angel-block.php file and put the below code. It will define the plugin and call the javascript and css files.
<?php
/*
Plugin Name: Custom Author Comment Block
Version: 1.10.3
Author: John Smith
License: GPL v2 or later
*/

function custom_author_comment_block_init() {
    wp_register_script(
        'custom-author-comment-block-script',
        //Calling the js file
        plugins_url('dist/block.js', __FILE__),
        array('wp-blocks', 'wp-element', 'wp-editor')
    );

    register_block_type('custom/author-comment-block', array(
        'editor_script' => 'custom-author-comment-block-script',
    ));
}
add_action('init', 'custom_author_comment_block_init');


//Calling the css file
function custom_author_comment_block_enqueue_styles() {
    wp_enqueue_style(
        'custom-author-comment-block-styles',
        plugins_url('css/block-styles.css', __FILE__),
        array(),
        '1.0.0'
    );
}
add_action('enqueue_block_assets', 'custom_author_comment_block_enqueue_styles');
Block Registration, Editing, Attributes, and Rendering
Now open the block.js from the dist folder and paste the following code. This will create the WordPress block which can be accessible on both the page and post.
(function (blocks, editor, element, components) {
var el = element.createElement;
var { RichText, InspectorControls } = editor;
var { TextControl, TextareaControl } = components;
blocks.registerBlockType('custom/author-comment-block', {
title: 'Author Comment Block',
icon: 'admin-comments',
category: 'common',
attributes: {
author: {
type: 'string',
default: '',
},
comment: {
type: 'string',
default: '',
},
},
edit: function (props) {
var author = props.attributes.author;
var comment = props.attributes.comment;
function onChangeAuthor(value) {
props.setAttributes({ author: value });
}
function onChangeComment(value) {
props.setAttributes({ comment: value });
}
return [
el(
InspectorControls,
{ key: 'inspector' },
el('div', { style: { padding: '16px' } }, // Add padding here
el(TextControl, {
label: 'Author',
value: author,
onChange: onChangeAuthor,
}),
el(TextareaControl, {
label: 'Comment',
value: comment,
onChange: onChangeComment,
rows: 5,
})
)
),
el('div', { className: 'author-comment-block' },
el(RichText, {
tagName: 'p',
className: 'author-name',
placeholder: 'Enter author name',
value: author,
onChange: onChangeAuthor,
}),
el(RichText, {
tagName: 'div',
className: 'comment-content',
placeholder: 'Enter comment',
value: comment,
onChange: onChangeComment,
})
)
];
},
save: function (props) {
var author = props.attributes.author;
var comment = props.attributes.comment;
return el('div', { className: 'author-comment-block' },
el('p', { className: 'author-name' }, 'Author: ', author),
el('div', { className: 'comment-content' }, 'Comment: ', el(RichText.Content, { value: comment }))
);
},
});
})(
window.wp.blocks,
window.wp.editor,
window.wp.element,
window.wp.components
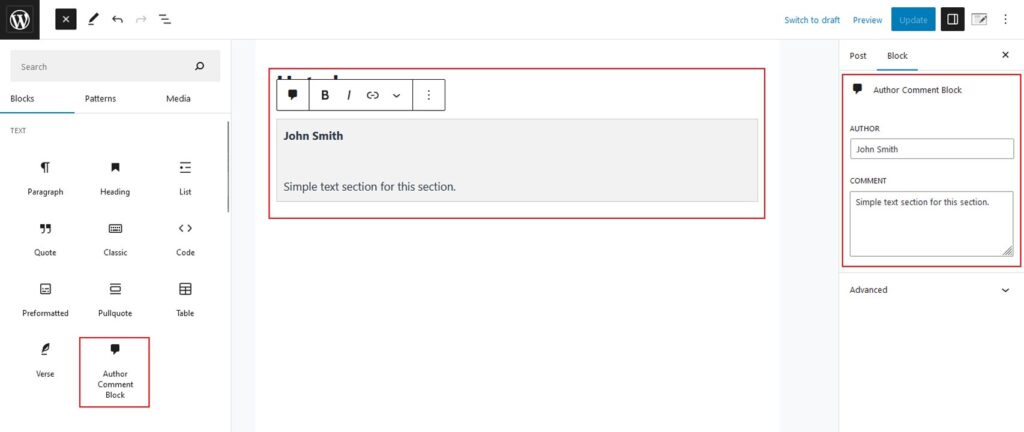
);The backend will look like this where you can add the block and add the name of the author and the comment from him. On the right side inspector, you can use that also to populate the text field.
Styling the Block
Open the block-styles.css from the css folder and paste the following code to style block output.
.author-comment-block {
    padding: 10px;
    background-color: #f2f2f2;
    border: 1px solid #ccc;
    margin-bottom: 20px;
}

.author-name {
    font-weight: bold;
}

.comment-content {
    margin-top: 50px;
}
Bottomline
Congratulations! You have successfully created a custom WordPress block, the Author Comment Block. In this article, we explored the process of setting up the development environment, creating the block plugin, and implementing block registration, attributes, editing functionality, and rendering. We also learned how to style the block using css. This is just the beginning of your journey into WordPress block
Photo by: Lavi Perchik on Unsplash